


What DPI Do I Need for Printing? A Simple Resolution Guide
What DPI do I need for printing? It sounds like a simple question, but the answer depends on what you’re printing, how large it will be, and how far away people will be when they look at it.
For a brochure held in your hand, 300 DPI is a good target. For a 10-foot banner viewed from across a room, 300 DPI may be far more resolution than you need.
And there’s one other detail worth clearing up first: when we’re talking about the resolution of an image file, PPI is technically the correct term. DPI refers to the dots a printing device puts on paper or another substrate.
Still, most people use DPI and PPI interchangeably when preparing print files. We’ll use DPI throughout this article because that’s what most people search for, but we’ll explain what really matters when you send artwork to print.
The Short Answer: 300 DPI Is Usually Best for Printed Materials
If you’re designing something people will hold and view up close, 300 DPI at the final printed size is the standard target.
That includes:
- Brochures
- Flyers
- Postcards
- Catalogs
- Business cards
- Sales sheets
- Booklets
- Direct mail
- Product literature
At normal reading distance, 300 DPI provides enough image detail for photographs and other raster graphics to reproduce cleanly.
There’s a real reason behind that number, and it isn’t arbitrary. A press doesn’t print continuous tone — it reproduces a photograph as a grid of halftone dots, and most commercial sheetfed work runs a 150-line screen. The long-standing rule of thumb is to supply image resolution at roughly twice the line screen: 2 × 150 lpi = 300 ppi. Supply much less and the screening process has too little information to build clean halftone dots. Supply much more and it simply throws the extra away.
But 300 DPI is not a universal requirement.
As the finished piece gets larger and the viewing distance increases, the required image resolution can decrease considerably.
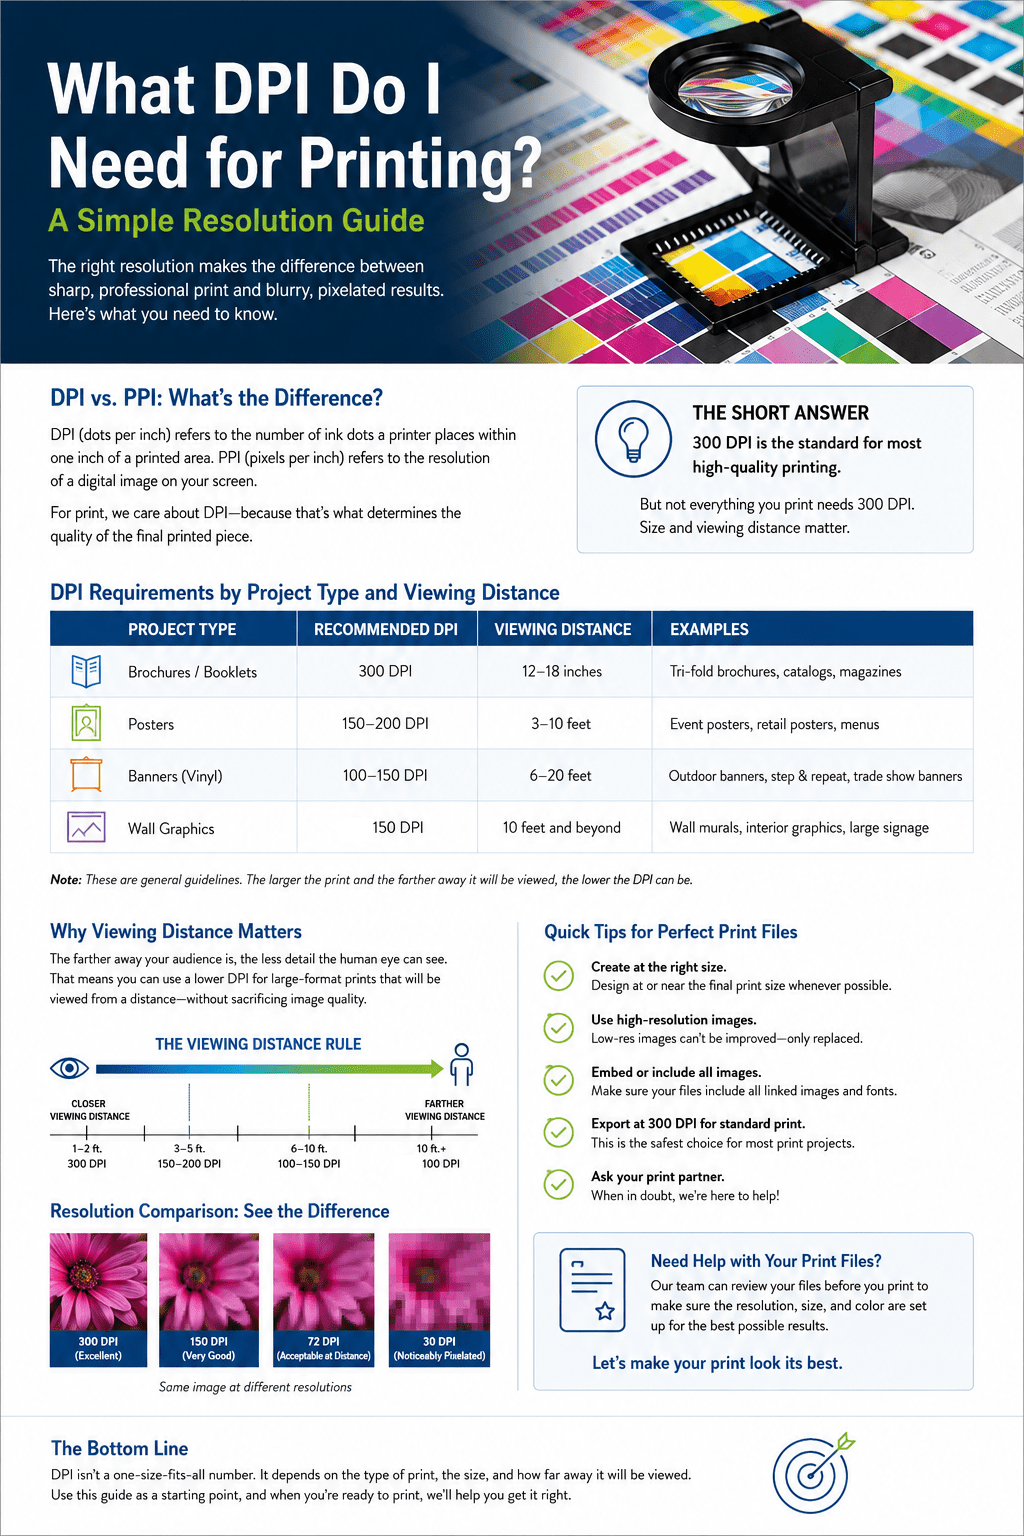
Recommended DPI by Print Type and Viewing Distance
The table below gives practical starting points for common print applications.
| Print Product | Typical Viewing Distance | Recommended Effective Resolution |
|---|---|---|
| Brochures, flyers and sales sheets | 10 to 18 inches | 300 DPI |
| Postcards and direct mail | 12 to 24 inches | 250 to 300 DPI |
| Small posters | 2 to 5 feet | 150 to 300 DPI |
| Trade show banners and displays | 5 to 10 feet | 100 to 150 DPI |
| Indoor wall graphics | 3 to 10 feet | 100 to 150 DPI |
| Large wall murals | 10 to 20 feet | 75 to 125 DPI |
| Outdoor banners | 10 to 30 feet | 75 to 100 DPI |
| Large exterior graphics | 25 feet or more | 50 to 75 DPI |
| Billboards | 50 feet or more | 25 to 50 DPI |
These numbers are guidelines, not hard rules.
Billboard artwork, for instance, is frequently built at one-tenth scale at 300 PPI, which works out to roughly 30 PPI at final size — comfortably inside the range above.
A wall graphic containing detailed photography that people can walk right up to may benefit from considerably higher resolution than a wall graphic mounted 20 feet above the floor.
The artwork itself matters too. Faces, small product photography, fine patterns and detailed textures tend to show low resolution faster than clouds, backgrounds or simple graphic elements.
Why Viewing Distance Changes the DPI You Need
Think about standing a foot away from a brochure.
You can see tiny type, skin detail in a photograph and small edges in an illustration. If the image resolution is low, you’ll probably notice.
Now think about a banner hanging 20 feet away.
Your eye can’t resolve the same level of fine detail at that distance. A lower-resolution image can still appear sharp because you’re seeing the entire graphic rather than inspecting individual pixels.
This is why a 150 DPI image can work very well on a large display but look soft in a printed catalog.
The larger the viewing distance, the less image resolution you generally need.
DPI vs. PPI: What’s the Difference?
This causes a lot of confusion.
PPI means pixels per inch.
It describes the number of pixels in your digital image relative to the size at which it will print.
DPI means dots per inch.
It describes the physical dots a printer or printing device uses when reproducing an image.
For example, a commercial printing press or inkjet printer may place many individual ink dots within the area represented by a single image pixel.
So when someone tells us, “This photo is 300 DPI,” they usually mean the image is 300 PPI at its intended print size.
For day-to-day print file preparation, the distinction isn’t something you need to lose sleep over. What matters most is the effective resolution of the image at the size you’re actually printing it.
Effective Resolution Is What Really Matters
Here’s where resolution problems usually happen.
Let’s say you have a photograph that is 3,600 pixels wide.
At different print sizes, its effective resolution changes:
| Printed Width | Effective Resolution |
| 12 inches | 300 PPI |
| 18 inches | 200 PPI |
| 24 inches | 150 PPI |
| 36 inches | 100 PPI |
| 48 inches | 75 PPI |
It’s still the exact same image.
Nothing happened to the original file. You’re simply spreading those 3,600 pixels across a larger area.
That’s why asking, “What is the DPI of this photo?” doesn’t always give you enough information.
A better question is:
What is the effective DPI at the size we’re going to print it?
The Simple Formula for Calculating Print Resolution
You can calculate effective resolution with a simple formula:
Pixel dimension ÷ printed dimension in inches = effective PPI
For example, suppose your photograph is:
4,500 pixels wide
You want to print it:
15 inches wide
The calculation is:
4,500 ÷ 15 = 300 PPI
That’s a very good resolution for a brochure, poster or other close-viewed piece.
Now use that same image at 30 inches wide:
4,500 ÷ 30 = 150 PPI
That may still work very well for a poster or display viewed from several feet away.
Stretch it to 60 inches:
4,500 ÷ 60 = 75 PPI
Now we’re into large-format territory, where viewing distance becomes an important part of deciding if the image will work.
Why Changing a File From 72 DPI to 300 DPI Doesn’t Fix It
This is one of the most common resolution mistakes we see.
Someone opens a 72 DPI image in Photoshop, changes the resolution box to 300 DPI and assumes the image is now high resolution.
It isn’t.
If you simply change the DPI setting without adding real image information, you haven’t created additional detail.
The number of pixels available is what matters.
For example:
An image measuring 1,200 × 1,800 pixels contains exactly the same amount of image information if its metadata says 72 DPI, 150 DPI or 300 DPI.
At 300 PPI, that image can reproduce at:
4 × 6 inches
At 150 PPI, it can reproduce at:
8 × 12 inches
The pixels didn’t change. Only the intended print size changed.
Can I Just Enlarge a Low-Resolution Image?
You can make almost any image larger.
That doesn’t mean it will look better.
Traditional upsampling software creates additional pixels by estimating what should exist between the original pixels. Modern AI-based tools can sometimes do a better job because they attempt to reconstruct missing detail.
But neither method can fully replace good original photography or properly sized artwork.
Upscaling can help in some situations, especially when the original image is reasonably good. It isn’t a dependable fix for a tiny website image that needs to become a 10-foot wall mural.
Starting with the highest-quality original file is still the best approach.
Why Images From Websites Often Cause Print Problems
An image can look great on your computer screen and still make a terrible print file.
The 72 PPI figure people still repeat comes from early Macintosh displays, and it stopped describing reality a long time ago. A Retina laptop or a 4K monitor can run 220 PPI or higher — not far off print territory. So the problem usually isn’t that your screen is coarse. It’s that the image only ever contained enough pixels to fill the few inches of screen space it was saved for.
Computer displays require much less image information than many printed pieces.
Website images are also frequently resized or compressed to make pages load faster.
A photo pulled from a website might only be 800 or 1,200 pixels wide. That can look perfectly fine on a laptop.
Try using that same image across the cover of a 9 × 12 brochure or enlarging it for a trade show display and you’ll probably see the problem.
Whenever possible, go back to the original photography rather than pulling an image from a website.
How to Check Image Resolution in Adobe InDesign
If you’re working in Adobe InDesign, checking effective resolution is easy.
- Select the image.
- Open Window > Links.
- Select the image in the Links panel.
- Look at Effective PPI in the Link Info section.
Pay attention to Effective PPI, not only Actual PPI.
For example, you might place a 300 PPI photograph into InDesign and enlarge it to 200%.
Its original resolution is still 300 PPI, but its effective resolution is now approximately:
150 PPI
If you reduce that same photograph to 50% of its original size, its effective resolution becomes approximately:
600 PPI
This is one of the fastest ways to find problem images before you create your final PDF.
How to Check Resolution in Adobe Photoshop
In Photoshop:
- Open the image.
- Go to Image > Image Size.
- Look at the pixel dimensions.
- Look at the Width, Height and Resolution settings.
- Turn Resample off if you want to see how changing print size affects resolution without changing the image’s actual pixels.
For most commercial print projects viewed up close, you’re looking for approximately 300 PPI at final size.
For large-format graphics, lower values may be completely acceptable.
What About Vector Graphics?
Here’s the good news.
Logos and illustrations created as true vector artwork do not have the same resolution limitations.
Vector graphics use mathematically defined paths rather than a fixed grid of pixels. That means you can scale a vector logo from a business card to a building graphic without creating pixelation.
Common vector formats include:
- Adobe Illustrator AI files
- EPS files
- Some PDF files
- SVG files
This is one reason we strongly recommend maintaining vector versions of corporate logos.
Keep in mind that placing a low-resolution photograph inside an Illustrator file does not magically turn that photograph into vector artwork. Raster images embedded or linked inside vector files still have resolution limits.
Does Higher Resolution Always Mean Better Print Quality?
Not necessarily.
Sending a 1,200 PPI photograph for a brochure doesn’t make it better than the same photograph at 300 PPI. It just makes it heavier. Four times the linear resolution means sixteen times the pixel data and roughly sixteen times the file size — and on a 150-line screen, none of it survives to the sheet.
Once you’ve supplied enough resolution for the printing process and viewing distance, additional pixels may provide little or no visible improvement.
They can, however, create:
- Larger files
- Slower uploads
- Longer processing times
- More demanding RIP and production workflows
The goal isn’t to create the highest-resolution file possible.
The goal is to supply enough resolution for the final size and viewing conditions.
A Quick Print Resolution Checklist
Before sending artwork to your printer, check these items:
- Is the artwork being viewed up close or from a distance?
- What is the final printed size?
- Are photographs approximately 300 PPI for close-viewed work?
- Have you checked the effective resolution after scaling images?
- Are large-format graphics using a resolution appropriate for their viewing distance?
- Did you use original images instead of images downloaded from a website?
- Are logos and line art vector whenever possible?
- Have you avoided enlarging small raster images beyond a reasonable size?
- Did you check questionable images at final output size?
If you’re unsure about one of your images, send it to your printer before spending hours building the rest of the project around it.
So, What DPI Do I Need for Printing?
For most brochures, flyers, postcards and other printed pieces viewed at arm’s length, start with 300 DPI at final size.
For posters, banners, wall graphics and other large-format printing, the right resolution depends heavily on viewing distance.
As a general guide:
Close viewing = higher resolution
Longer viewing distance = lower resolution can work
And remember, the number attached to the image file isn’t the whole story. The effective resolution at the final printed size is what matters.
At Graphic Solutions Group, our prepress and large-format teams review image resolution every day. If you’re not sure an image will reproduce properly, send us the file and tell us how large you want to print it.
We’ll tell you what you’re working with before it becomes a problem on press.
Start here:
👉 https://www.gsghome.com
Contact Us for More Information
Are you looking for a printer who can help you meet your deadlines?
Then your in the right place! Have any questions or concerns we would love to hear from you.
Please submit your information in this form and a sales professional will reach out to you.
Want to Speak to a Sales Representative? Call 770-424-2300